How to modify EHLO name used by SMTPDA
Document #:10367
Applies To:
- MailSite
7.x
- MailSite
8.x
- MailSite
9.x
Synopsis:
This version of MailSite has a new feature that allows you to customize the EHLO name used by MailSite when talking to remote mail servers for each domain that MailSite is administering.
More Information:
Previous versions of MailSite used the local TCP/IP machine name when sending messages to remote servers. It is now possible to specify the TCP/IP hostname to be used for each MailSite domain, allowing hosted environments to appear to the outside world as distinct domains.
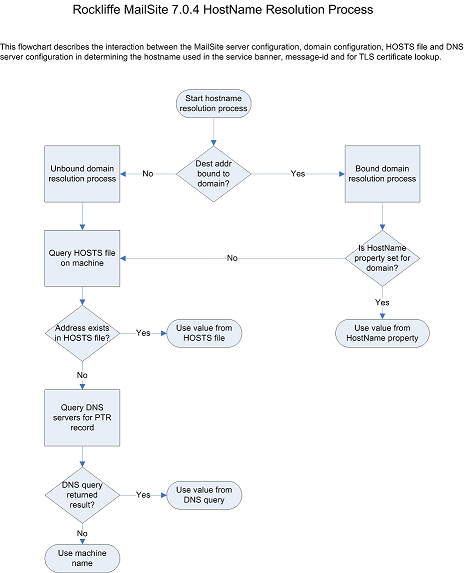
Below is a diagram of how we obtain the hostname for the hosted domain within MailSite.

There are a number of ways to change the value returned;
- Windows Hosts file
- DNS record
- HostName values held within MailSite
Details on how to change the values for each method can be found below.
Windows Hosts File
To change the name via the hostname file
- Open Windows Explorer and navigate to this folder 'C:\Windows\System32\Drivers\Etc' or 'C:\Winnt\System32\Drivers\Etc'
- Open the file called 'HOSTS'
- At the bottom of the file add entry like XXX.XXX.XXX.XXX mail.domain.com where XXX.XXX.XXX.XXX is the IP bound to the domain and mail.domain.com is the value you want SMTPDA to report.
DNS Record
Add A and PTR records mapping the domain name you want to display with the IP address that you have bound to the domain.
HostName Values Held Within MailSite
The procedure for changing this varies depending on whether you have a Registry or SQL configuration. It is not possible to specify the hostname for the default domain so this first must be moved to a virtual domain, details are below:
Registry Configuration
WARNING!!
Incorrectly editing the Registry can damage the server, please proceed with care.
- Click on the Start button.
- Select Run, and enter Regedit
- Navigate to HKEY_LOCAL_MACHINE\SOFTWARE\ROCKLIFFE\MAILSITE\Domains\Name_of_domain_to_alter
- Create a new String Value and name it HostName
- Hit Enter and then specify the desired name, e.g. mail.domain.com press OK.
- Create a new String Value and name it IPAddress
- Hit Enter and then specify the the 192.x.x.x IP that is bound to the NIC card on the server
- OK and Exit out of Regedit
- Restart all the MailSite services. A telnet to that IP should now respond with mail.domain.com. This same hostname will be used for all connections coming into that IP for all virtual domains on your server.
SQL Connector Configuration
- Open the SQL Manager to the MailSite Database.
- Open the 'DomainNames' Table and locate the DomainId for the intended domain, then close the table.
- Open the 'DomainProperties' table and locate the row with the corresponding DomainId.
- Within the field called HostName enter the domain name that you want to be assigned.
- Within the MailSite Console click on the Domain > Domain Properties. In the field called 'IP Address' enter the IP that you want to be bound to that domain.
- Restart all the MailSite services. A telnet to that IP should now respond with mail.domain.com. This same hostname will be used for all connections coming into that IP for all virtual domains on your server.
Moving the Default Domain to a Virtual Domain
This only needs to be done if you wish to specify the hostname of the default domain with the registry or SQL database.
- Rename your default domain in MailSite to domain.old. Right click on the domain and choose rename. This effectively becomes a dummy domain that is not used.
- Create a new virtual domain called example.com or whatever your default domain used to be.
- View your Mailboxes under the default.old domain and highlight all of these. Right click and choose Move. Select the new example.com domain.
- Within your BOX folder on the hard drive you will also need to move the mailboxes to the new correct BOX path as specified within the example.com Domain Properties BOX path.
Related:
See these other knowledge base documents:
Last revised 2011-10-18